|
I have always loved sharing easy photo wall gallery ideas. It seems natural to incorporate photos into my decor since the people in those photos are so important to me. More recently, I have begun adding photos to my spaces on a larger scale: I added old family photo to our upstairs hallway and a photo to our hallway landing.
However, my favorite photo wall gallery is in our family room (on the other side of our kitchen wall). I originally created the wall using IKEA frames (see more here), but I was having issues with the frames warping over time. When Frame It Easy asked to partner, I was excited to update my sagging frames. If you aren't familiar with Frame It Easy, they offer online custom picture frames that are easy, affordable and fast. I have to also mention that they offer photo printing, and I am SO impressed with the quality. The photos are gorgeous.
When you go to Frame It Easy's website, you select the art size, the frame style, the mat size, the cover and the backing. The frames came in one large box, and all I had to do was remove a protective cover from the acrylic front. The frames came ready to hang – it was so easy!
I went with thin gold frames to accent the gold in our kitchen, and the wall is perfect.
I was able to select a custom frame size that would work perfect for my space.
I always struggle with framing photos because I find a random piece of hair stuck in between the glass and photo, but not this time! The photos came perfectly framed without any dust, debris or random hair!
I also added a small photo gallery wall to my home office (which is also our master bedroom).
I selected a square frame for the center and two matching horizontal frames for either side.
Do you have some blank walls you'd love to dress up with some new photo galleries? I have a coupon code to help you get started. You can save 10% with the code “SARAD” if you order before February 1, 2019. Also, come see me on Instagram where one lucky person will receive a $100 credit to Frame It Easy!
This is a sponsored post written by me on behalf of Frame It Easy. All opinions are 100% mine. Find me on Facebook | Instagram | Twitter | Pinterest The post Easy Photo Wall Gallery Ideas appeared first on Sincerely, Sara D..
0 Comments
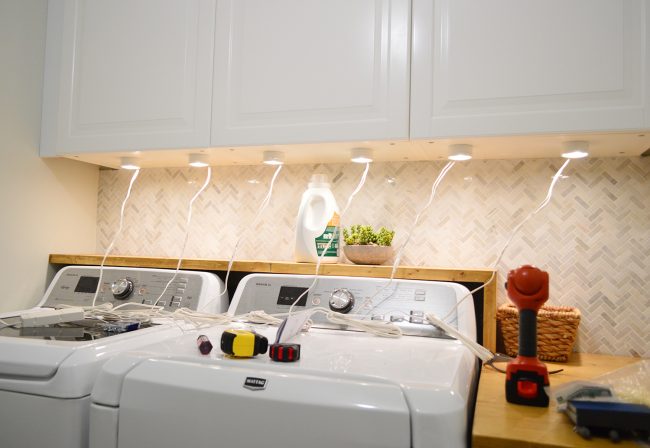
The post Goodbye 2018 + A Reader Survey appeared first on DIY Playbook. We've done so few upper cabinets in our recent kitchens that we actually haven't installed under cabinet lighting in ANY of them. But we did install it under the cabinets in our laundry room and – surprise! – I just came across a bunch of pictures of the installation process that I took waaaaaay back in 2014 but never shared. It's a remarkably straightforward process, so it could be an easy upgrade if you needed more task lighting in your kitchen, laundry room, or any other space with upper cabinets.
The cabinets in here are from Ikea, so we also used one of their stock under-cabinet lighting options called GRUNDTAL Spotlights. These don't appear to be sold anymore, but the current OMLOPP spotlight seems to be a similar (even improved!) version. The OMLOPP ones are now LED and are lower profile, plus some cord management covers are included, which is nice. Based on the downloadable instruction sheet, the new ones install almost exactly the same way, so the same basic steps I'm about to outline for you here still apply.
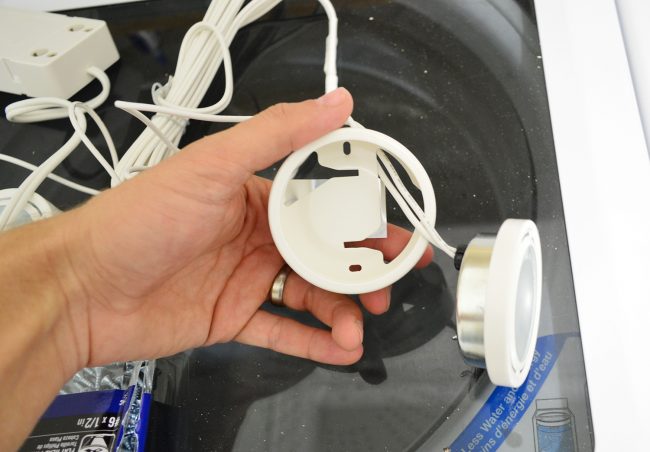
Most people do one spotlight per cabinet but we wanted to give the appearance of one continuous bar of light, rather than distinct spotlights under each cabinet, so we decided to do more. The GRUNDTALs were sold as 3 packs, so we did 6, but 4 or 5 probably would've done the job just fine. The first step, once everything is unpackaged, is to pop the actual lightbulb portion of each spotlight out of its casing, leaving the wiring in place.
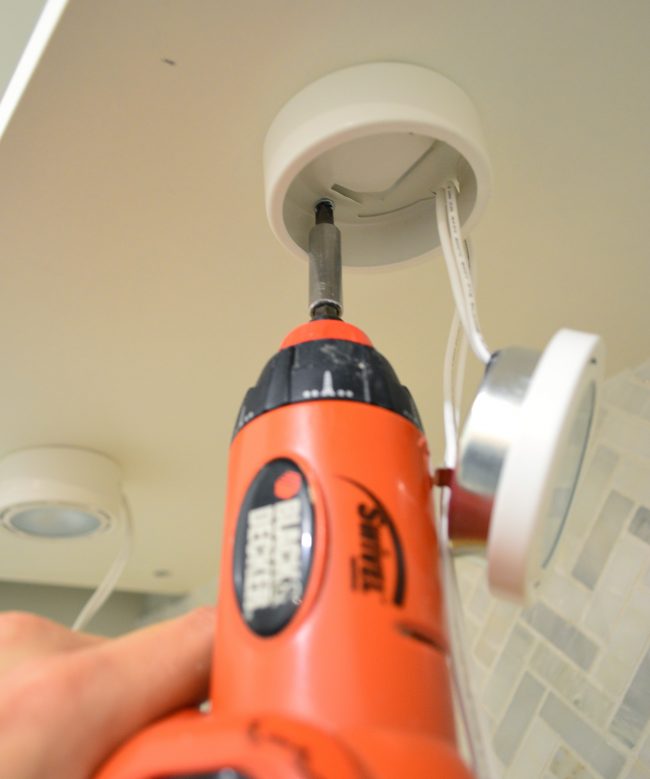
This exposes the holes that you're supposed to screw through to secure the light to the underside of your cabinet. Just be sure to measure and mark your placement before you start doing this. We centered each spotlight front-to-back on the cabinet and spaced them equally apart side-to-side (around 10″ away from the next one). We secured ours using 1/2″ screws so that they wouldn't poke through the inside of the cabinet. Then the light just snaps back into place.
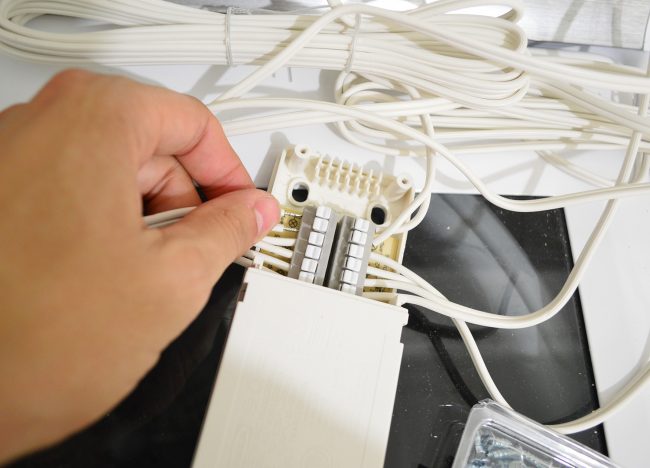
Once all of your spotlights are secured, you need to connect everything to the transformer box. This is sold separately from the new OMLOPP spotlights, as is the power cord. I know that sounds kinda crazy, but they sell things a la carte like that because the number of transformers and power cords you need depends on how many spotlights you're installing (you can add up to 9 spotlights per box, and up to 10 boxes per power cord). The photo below is how I wired my spotlights to the transformer box, but the new stuff is even easier – it's basically like plugging in a phone charger.
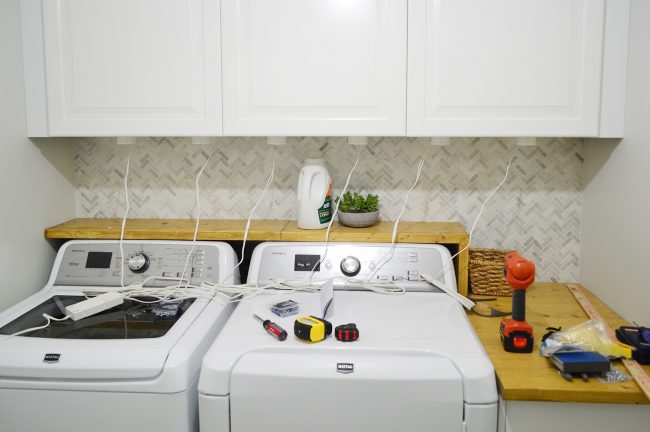
At this point your installation may look something like this. The cord situation is not very pretty, but before dealing with that it's always a good idea to check that all of your connections work.
The transformer just plugs into any regular outlet and it has a toggle switch on the cord, so you can get everything powered up without the help of an electrician. So it was super easy to get ours working within minutes.
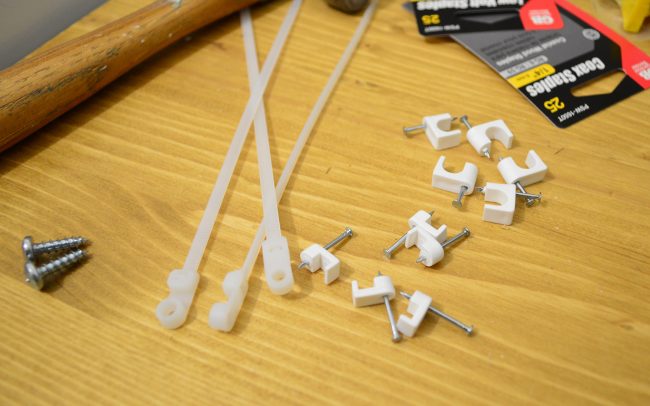
The newer spotlights come with some cord covers to help hide the wires against the bottom of the cabinet, but you still might have to get creative with all the extra wire between the cabinet and the transformer. I picked up a variety of cord management options from the store and the most helpful items ended up being these mounting ties (basically a zip tie with a screw hole) and some wire staples (you may need to swap in different nails or screws if the provided ones are long enough to poke through your cabinet bottom).
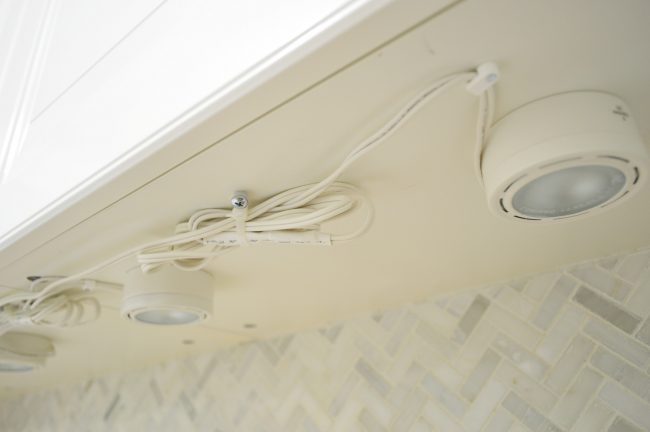
Yours probably won't look quite this messy with the newer system, but you can see what I did with ours. I wrapped up most of the excess wire in a zip tie (screwed in place) and then kept everything else tight to bottom with the wire staples.
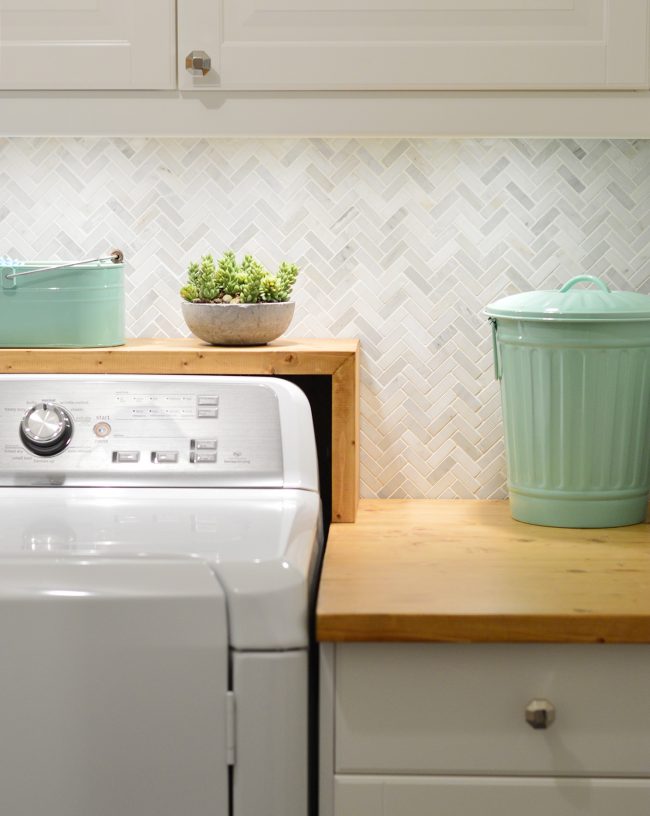
You see zero of this chaos thanks to a cover piece that you add later. You'd pretty much have to lean over the washer and dryer and put your head under the cabinet to get a good look at it once it's boxed in with that cover piece, but I'll get to that in a minute.
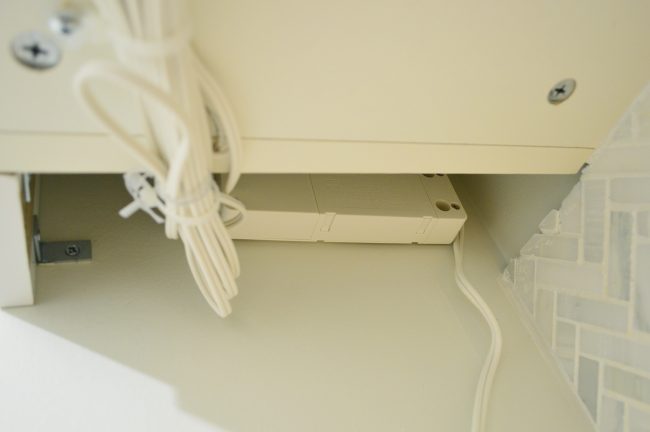
Back to the whole “wire management” thing. You also have to find a place to hide your transformer box. Ours got mounted behind a gap on the side of one cabinet that's hidden with a filler piece in front of it (the transformer box comes with holes for mounting it with screws). That placement also allowed the power cord to hug the corner as it snakes down to the outlet.
A couple of years after our initial installation we had an electrician hardwire the power cord to a switch on the wall, and that makes it even easier to flip on and off. But when there was a wire tucked along that left corner, it wasn't really that bad. You can hardly see it in this photo:
One more word about the transformer box: I actually think a more popular location for that is ON TOP of your cabinets, but you may need to install an outlet up there. Ikea sells a remote so you can turn everything on and off without needing to have access to the power cord switch. Pretty smart. The last thing we did was to install that cover strip I mentioned across the bottom of the cabinetry to hide the lights and their wiring. It's just a spare filler piece that Ikea sells, mounted in place using small L-brackets and caulked at the seams.
We don't really mind the cover piece on the bottom, but I do feel like it's one shortcoming of the Ikea system. Their cabinets are totally flat on the bottom, as opposed to lots of other cabinets that have a slightly recessed area that's great for tucking lighting into. That's probably why they've improved this new system by giving it a slimmer profile and including cord covers.
I don't have my receipts saved from this project, but the same set up with the new system would be about $75 ($90 if you include the remote). And you could cut the cost down to about $45 if you just did three lights and used this smaller transformer.
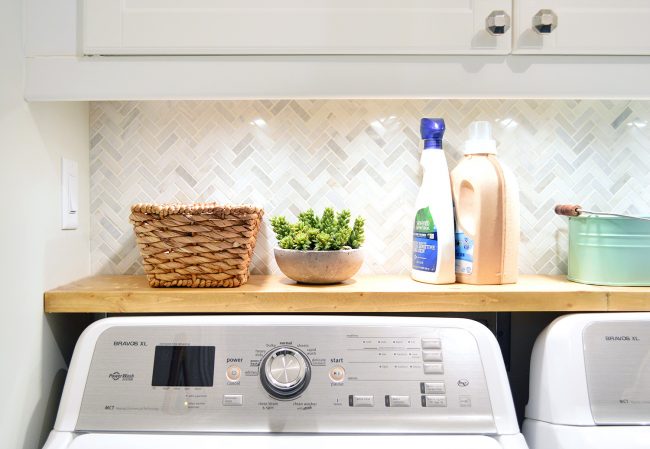
Here's an updated photo taken this month of the switch we had installed that turns ours on easily. We probably only use these lights around 50% of the time, just because the ceiling light is pretty adequate for such a small room, but we still think they're a great “nice to have” upgrade. Especially if you have an area that could use a little extra light.
So if you've been dying to add them somewhere or have just wondered how hard they are to install, hopefully this project illuminates (har-har) the fact that it's not a very daunting or expensive task to take on. Any beginner can do this one for sure. P.S. You can check out a summary of our entire laundry room makeover (including a full budget breakdown here). And if you're looking for a source list (paint colors, where you can find the green tins, etc) that's right here. *This post contains affiliate links* The post Installing Your Own Under-Cabinet Lighting appeared first on Young House Love. We've done so few upper cabinets in our recent kitchens that we actually haven't installed under cabinet lighting in ANY of them. But we did install it under the cabinets in our laundry room and – surprise! – I just came across a bunch of pictures of the installation process that I took waaaaaay back in 2014 but never shared. It's a remarkably straightforward process, so it could be an easy upgrade if you needed more task lighting in your kitchen, laundry room, or any other space with upper cabinets.
The cabinets in here are from Ikea, so we also used one of their stock under-cabinet lighting options called GRUNDTAL Spotlights. These don't appear to be sold anymore, but the current OMLOPP spotlight seems to be a similar (even improved!) version. The OMLOPP ones are now LED and are lower profile, plus some cord management covers are included, which is nice. Based on the downloadable instruction sheet, the new ones install almost exactly the same way, so the same basic steps I'm about to outline for you here still apply.
Most people do one spotlight per cabinet but we wanted to give the appearance of one continuous bar of light, rather than distinct spotlights under each cabinet, so we decided to do more. The GRUNDTALs were sold as 3 packs, so we did 6, but 4 or 5 probably would've done the job just fine. The first step, once everything is unpackaged, is to pop the actual lightbulb portion of each spotlight out of its casing, leaving the wiring in place.
This exposes the holes that you're supposed to screw through to secure the light to the underside of your cabinet. Just be sure to measure and mark your placement before you start doing this. We centered each spotlight front-to-back on the cabinet and spaced them equally apart side-to-side (around 10″ away from the next one). We secured ours using 1/2″ screws so that they wouldn't poke through the inside of the cabinet. Then the light just snaps back into place.
Once all of your spotlights are secured, you need to connect everything to the transformer box. This is sold separately from the new OMLOPP spotlights, as is the power cord. I know that sounds kinda crazy, but they sell things a la carte like that because the number of transformers and power cords you need depends on how many spotlights you're installing (you can add up to 9 spotlights per box, and up to 10 boxes per power cord). The photo below is how I wired my spotlights to the transformer box, but the new stuff is even easier – it's basically like plugging in a phone charger.
At this point your installation may look something like this. The cord situation is not very pretty, but before dealing with that it's always a good idea to check that all of your connections work.
The transformer just plugs into any regular outlet and it has a toggle switch on the cord, so you can get everything powered up without the help of an electrician. So it was super easy to get ours working within minutes.
The newer spotlights come with some cord covers to help hide the wires against the bottom of the cabinet, but you still might have to get creative with all the extra wire between the cabinet and the transformer. I picked up a variety of cord management options from the store and the most helpful items ended up being these mounting ties (basically a zip tie with a screw hole) and some wire staples (you may need to swap in different nails or screws if the provided ones are long enough to poke through your cabinet bottom).
Yours probably won't look quite this messy with the newer system, but you can see what I did with ours. I wrapped up most of the excess wire in a zip tie (screwed in place) and then kept everything else tight to bottom with the wire staples.
You see zero of this chaos thanks to a cover piece that you add later. You'd pretty much have to lean over the washer and dryer and put your head under the cabinet to get a good look at it once it's boxed in with that cover piece, but I'll get to that in a minute.
Back to the whole “wire management” thing. You also have to find a place to hide your transformer box. Ours got mounted behind a gap on the side of one cabinet that's hidden with a filler piece in front of it (the transformer box comes with holes for mounting it with screws). That placement also allowed the power cord to hug the corner as it snakes down to the outlet.
A couple of years after our initial installation we had an electrician hardwire the power cord to a switch on the wall, and that makes it even easier to flip on and off. But when there was a wire tucked along that left corner, it wasn't really that bad. You can hardly see it in this photo:
One more word about the transformer box: I actually think a more popular location for that is ON TOP of your cabinets, but you may need to install an outlet up there. Ikea sells a remote so you can turn everything on and off without needing to have access to the power cord switch. Pretty smart. The last thing we did was to install that cover strip I mentioned across the bottom of the cabinetry to hide the lights and their wiring. It's just a spare filler piece that Ikea sells, mounted in place using small L-brackets and caulked at the seams.
We don't really mind the cover piece on the bottom, but I do feel like it's one shortcoming of the Ikea system. Their cabinets are totally flat on the bottom, as opposed to lots of other cabinets that have a slightly recessed area that's great for tucking lighting into. That's probably why they've improved this new system by giving it a slimmer profile and including cord covers.
I don't have my receipts saved from this project, but the same set up with the new system would be about $75 ($90 if you include the remote). And you could cut the cost down to about $45 if you just did three lights and used this smaller transformer.
Here's an updated photo taken this month of the switch we had installed that turns ours on easily. We probably only use these lights around 50% of the time, just because the ceiling light is pretty adequate for such a small room, but we still think they're a great “nice to have” upgrade. Especially if you have an area that could use a little extra light.
So if you've been dying to add them somewhere or have just wondered how hard they are to install, hopefully this project illuminates (har-har) the fact that it's not a very daunting or expensive task to take on. Any beginner can do this one for sure. P.S. You can check out a summary of our entire laundry room makeover (including a full budget breakdown here). And if you're looking for a source list (paint colors, where you can find the green tins, etc) that's right here. *This post contains affiliate links* The post Installing Your Own Under-Cabinet Lighting appeared first on Young House Love. This time of year, it's wonderful to bring holiday lights and greenery into the house to remind us of our gardens and add sparkle and cheer to our homes. Green is the color of renewal and regeneration, and for centuries evergreen trees and greenery have been used in winter celebrations as a symbol of everlasting life. From swags of evergreen to miniature table-top gardens, here are some ideas we love for decorating your home with live plants and fresh-cut greens and flowers.
Forcing bulbs is one of the easiest ways to brighten up the darkest weeks of the year. Image: Pistils Nursery.
Honor winter with a garland, anywhere in your home. This mix of fir, pine and arborvitae branches is accented with dried citrus, but you could decorate with anything that cheers your soul, from ribbons to seashells to toy animals. Image: One Kings Lane.
Fiddle-leaf figs are wildly popular for many reasons, including the fact that they bring a huge, bright pop of green indoors. Apartment Therapy has some good tips for keeping your fiddle-leaf fig happy and healthy. Image: Making It Lovely.
Norfolk Island Pines are wonderful evergreen houseplants-an excellent low-maintenance, small-footprint substitute for a Christmas tree. Image: White Flower Farm.
Decorate a centerpiece or add adorable details to a gift presentation with rosemary and holly berries. Image: Monrovia.
Make the most of winter sunlight by moving your houseplants to your brightest windows, and add even more beauty with pots of forced bulbs. Image: A Garden for the House | Delicious Living.
The post Indoor Plants & Greenery for the Holidays appeared first on Home Outside.
John Deere is updating its line of Worksite Pro “With new OSHA silica dust exposure rules, contractors are in need of attachments with options that meet these requirements and make contractors more competitive bidders,” said Jessica Hill, program manager, global attachments, John Deere Construction & Forestry. “We designed a new class of brooms to deliver more durability and job site protection to help our customers get the most of out of their investments.”
An adjustable baffle on BP pickup broom models increases hopper capacity by 22 percent, offering greater sweeping impact in each pass. A front caster wheel on BP models allows the brush to follow ground contours, while a front bumper on BR models provides extra strength and protection when sweeping close to walls or obstacles. An optional 510-mm (20-inch) gutter brush with wire bristles can be mounted on the right or left side of any model pickup broom for collecting material close to curbs.
An optional hood extension provides 180-degree brush coverage, while a rubber deflector prevents snow from blowing back onto the machine when winter strikes. An optional 114-liter (30-gallon) roof-mounted water tank kit is available for applications that require dust suppression. For added performance and durability, both the pickup broom and angle brooms feature a heavy-duty, high-torque, bidirectional motor coupled to the brush core through a 63.5-mm (2.5-inch) hex hub. The attachments' motor and bearing are protected within the broom-frame structure. Motor and bearing separate from the brush core without having to disconnect any hydraulic hoses, eliminating the risk of oil spills or contamination. The new pickup and angle brooms are backed by John Deere parts, service and warranty coverage. The post Snow, Debris Cleanup Easy With New John Deere Angle, Pickup Brooms appeared first on Turf. We're in the final countdown to Christmas! If you're wanting to take your holiday decor up a notch or two, today's post will show you how to give your garlands and wreaths a quick makeover. Not only are these greenery upgrades affordable, they're perfect for transitioning your Christmas decorations into New Year's Eve decor. By starting with basic holiday greenery (from the green to the frosted), you can have a designer look in no time. Feel free to choose faux greenery so you can reuse your decor next year! Keep reading for all of the hassle-free DIY details…
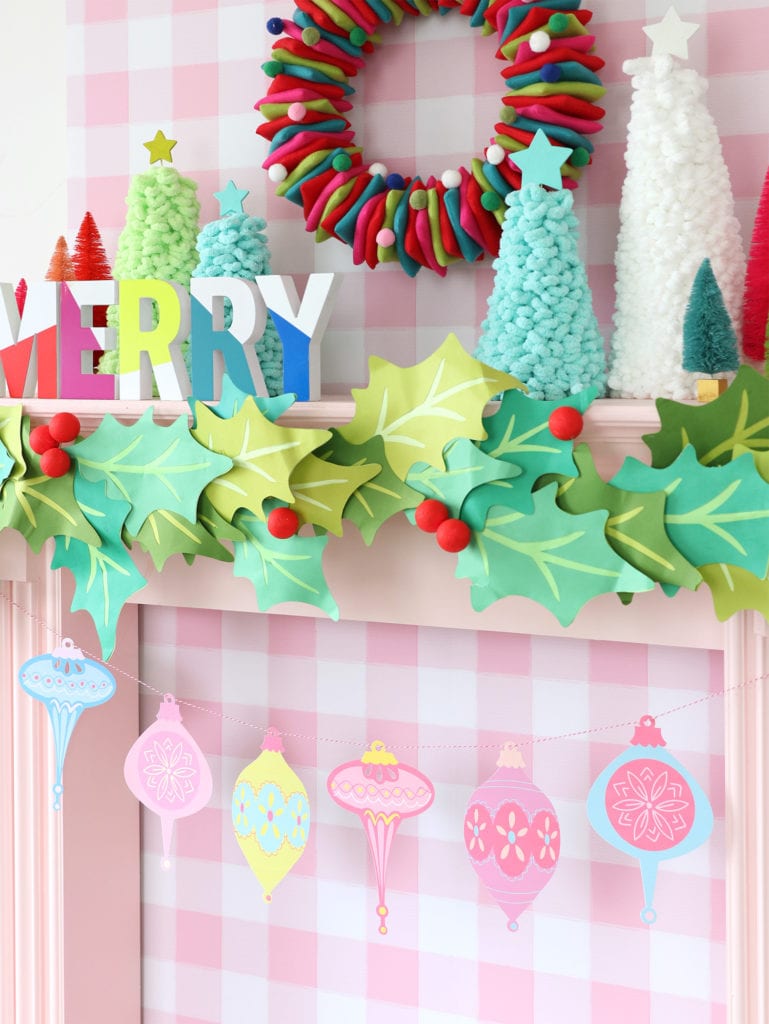
        *Photos and styling by Kate Simmons Gold Star GarlandThis first holiday greenery upgrade gives a nod to Scandinavian style. There's something so whimsical about gold stars. When they're wooden, the result is an earthy, modern look that beautifully complements the greenery of your choice!
Start with wooden craft stars. I ordered these from JOANN for a mere $4.99 a bag:
Paint your stars gold, or leave them untouched for a rustic look. Keep in mind that even painting them a “fancy” color like gold doesn't strip them of their simplicity and charm, especially if you leave the edges unfinished:
Display your stars by tucking them into your holiday garland. If you don't have a garland, rest assured there are some very affordable options out there (many of them pre-lit)! A dab of hot glue will secure the stars in place if need be. Avoid gluing them to wires or lights if your garland features lighting.
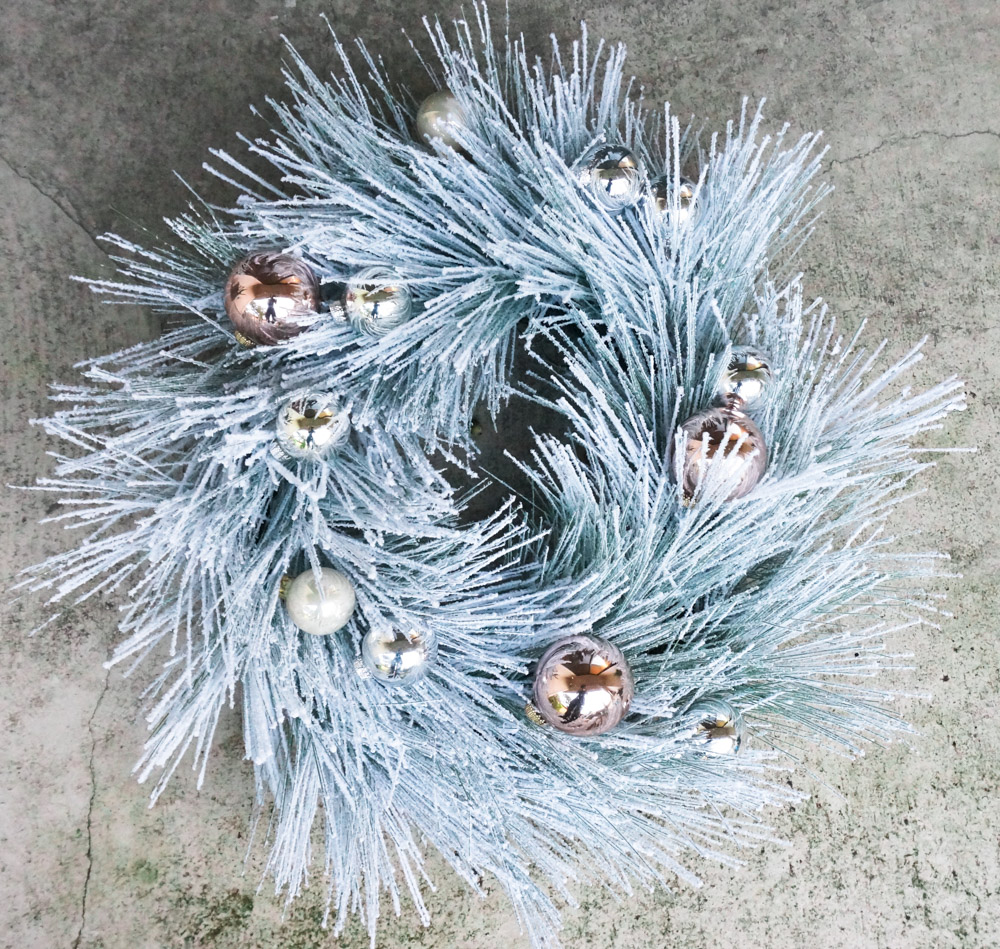
Metallic Ornament WreathThis next greenery upgrade idea involves metallic ball ornaments in various sizes. You can go with the budget-friendly ornaments you'll find at most craft stores in boxed sets, or you can opt for more ornate selections. The choice is yours! Bonus points if you incorporate a range of hues (from silver to rose gold). In fact, it's precisely this variety in tone that creates an upscale monochromatic look.
As you can see from the image below, metallic ornaments bring flocked greenery to life. Note how ornaments in rose gold, silver and pearl enhance a lovely artificial pine wreath from CB2:
It's that easy! Simply secure the ball ornaments to the wreath (we tied ours with string), and you're set.
Will you be taking your holiday greenery to new heights this year? You don't have to break the bank to get a high-end look. The magic is in the details! Happy Holidays! You're reading 2 Easy Ways to Dress Up Holiday Greenery, originally posted on Decoist. If you enjoyed this post, be sure to follow Decoist on Twitter, Facebook and Pinterest.
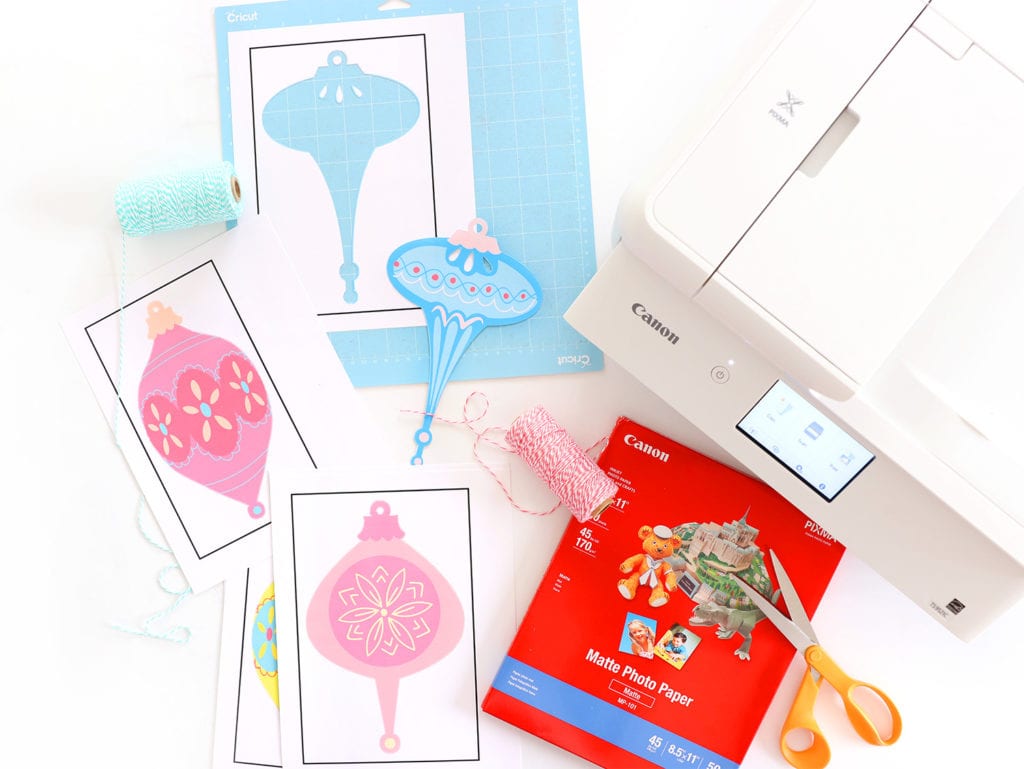
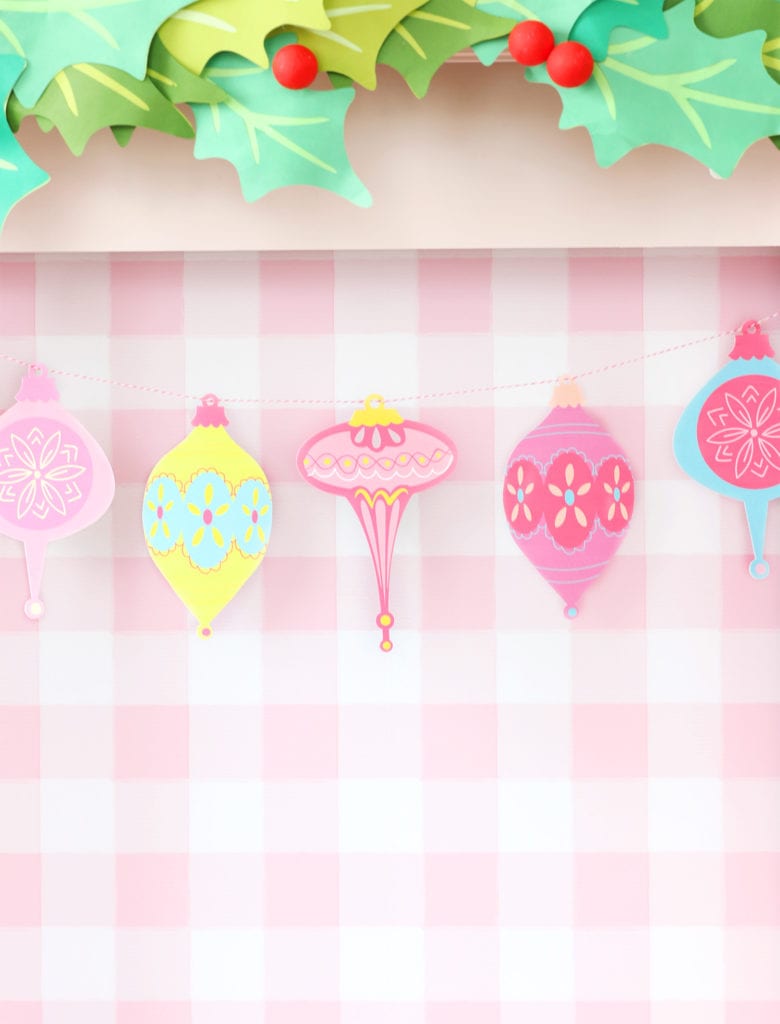
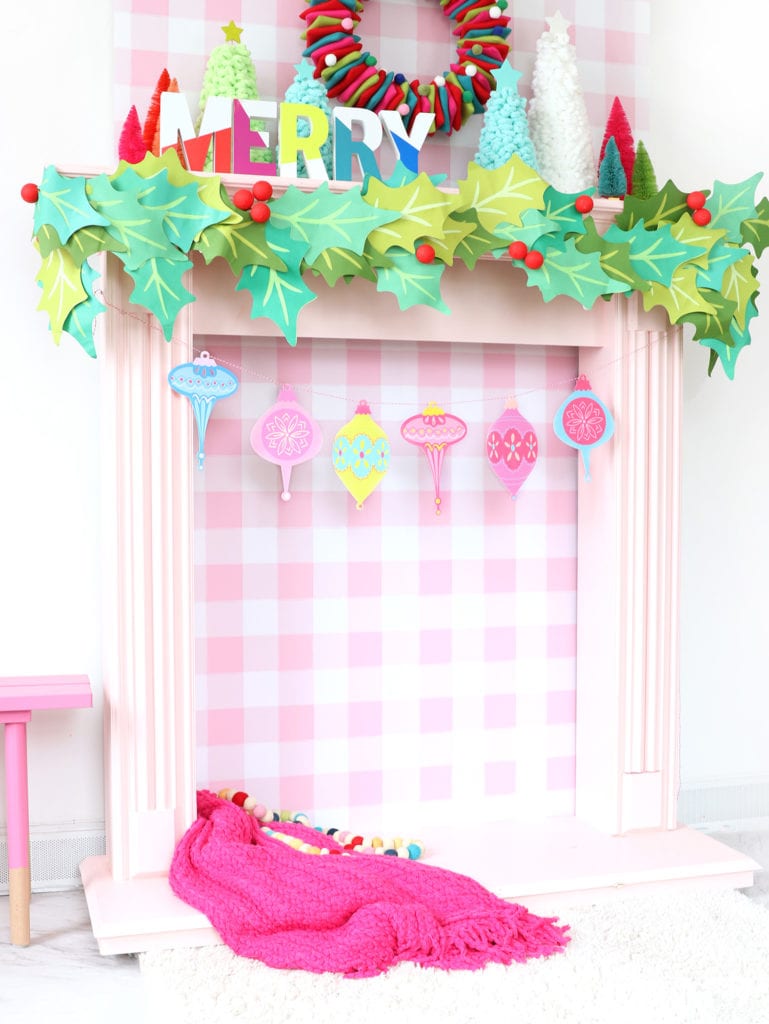
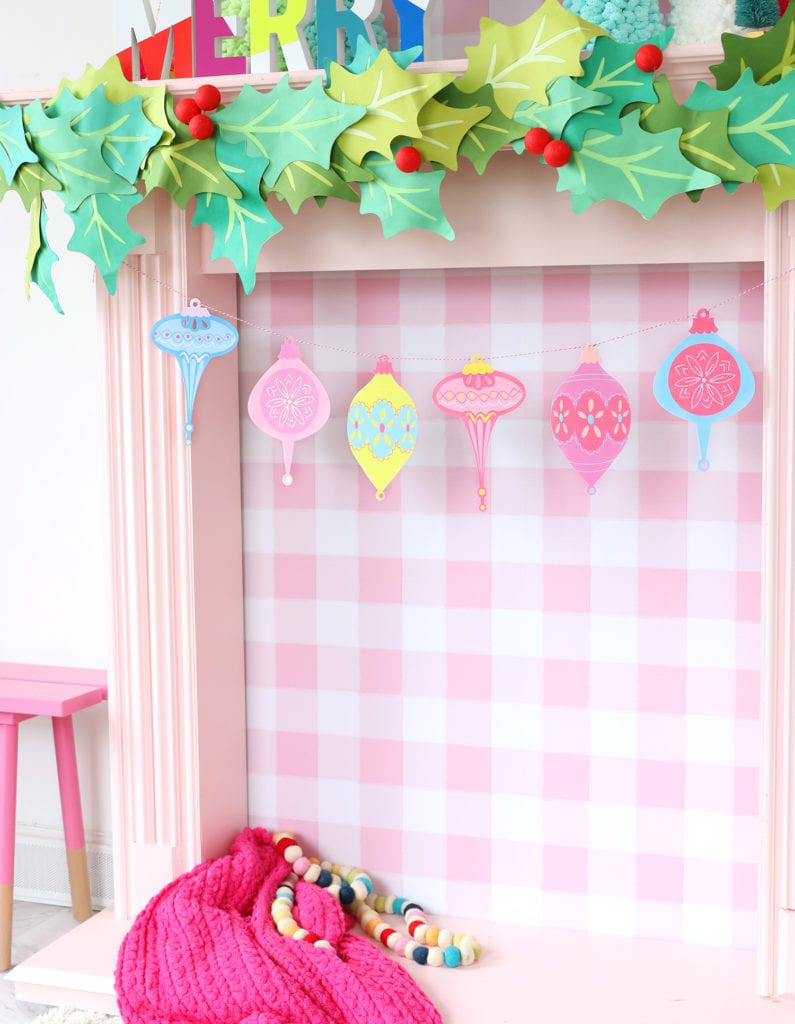
This year, I'm dreaming of a retro Christmas! Beyond the tree and the bows and the lights, I thought a simple printable garland would be the perfect finishing touch for this throwback look. These oversized ornaments are great for creating a banner for your mantle or even a fun way to decorate you tree or holiday table. To create these ornaments, I do have a few tips for you, so let's get started!
As always, you'll need to break out your Canon PIXMA TS9521C Printer. It's my go-to for colorful projects that need stand out – and in this case, it's my favorite printer for projects that include the Print-Then-Cut feature on my Cricut Explore Air 2. Here's what else you'll want on hand to create this easy decor:
To assemble:
*Note: If you notice that the ornaments are twisting or sliding on the twine, use a small dab of of glue to secure them in place on the twine
CLICK HERE TO DOWNLOAD YOUR RETRO ORNAMENTS AS PDF (if cutting with scissors) CLICK BELOW TO DOWNLOAD THE ORNAMENTS AS JPEG (if uploading to Design Space) Ornament 1 | Ornament 2 | Ornament 3 | Ornament 4 | Ornament 5 | Ornament 6
This is a sponsored conversation written by me on behalf of Canon. The opinions and text are all mine.
This is a sponsored conversation written by me on behalf of Canon. The opinions and text are all mine.
|
AuthorWrite something about yourself. No need to be fancy, just an overview. Archives
January 2019
Categories |


 Signing off for 2018, but not before we do one more thing...


 attachments with three new angle and five new pickup brooms. The BA72C, BA84C and BA96C angle brooms and the BP72C, BP84C, BR60C, BR72C and BR84C pickup brooms were designed for effortless cleanup in turf, snow and construction applications. Like all Worksite Pro attachments, these angle brooms are optimized to work with
  The new pickup brooms are superior solutions for dust mitigation challenges and restrictive barriers, like curbs and sidewalks. These pickup brooms feature a 660-mm (26-inch) diameter brush with standard 50/50 poly-wire segments and optional all-polypropylene brush segments, allowing operators to customize the attachment to their job site. The BR models use bolts for precise brush-contact adjustment, while the BP models incorporate a tool-free system for fast, easy adjustment. BP models feature a 12.7-mm (0.5-inch) single-bevel cutting edge; BR models have a 15.9-mm (0.625-inch) double-bevel cutting edge. Optional 95-liter (25-gallon) broom-mounted or 113.5-liter (30-gallon) roof-mounted water-tank kits are available for dust-suppression applications.
 Ideal for turf and snow removal applications, the BA model angle brooms feature a hydraulic-angling range of 30 degrees to the right or left of the machine. The 810-mm (32-inch) diameter brush features standard 50/50 poly-wire segments, a well-suited combination for dirt and debris cleanup on hard surfaces. Optional all-polypropylene brush segments are available for work on softer surfaces. Brush-core removal for bristle replacement is quick and easy, with no tools required. Foldaway storage stands help the brush maintain its round shape when not in use.


 RSS Feed
